Clustering
A cluster is a group of audio segments that share similar biometric characteristics. The system assumes that audio segments belonging to one cluster were spoken by the same person. A large group of audio segments spoken by the same person (a cluster) may be an indication of a fraudster attack. Combined with appropriate metadata and an analysis by a fraud specialist, clustering can help detect fraudsters.
For example, legitimate customers periodically call their bank to use its services. Fraudsters tend to make multiple calls in a limited amount of time under fake identities, to try and fool the system. Create an audio collection for all recently recorded audio, detect clusters within the audio collections, and use them to identify fraudster attacks and enroll new fraudsters.
Create a cluster job
To create clusters, schedule a cluster job. Afterwards, use the Analyst Overview to select and view the details of any cluster.
Each cluster job defines rules for selecting engagements. When the job runs, it analyses media from selected engagements. The cluster job uses the decisions, verdicts, and values of the engagements at the time of cluster job execution to create a Adjust factor ranking weights.
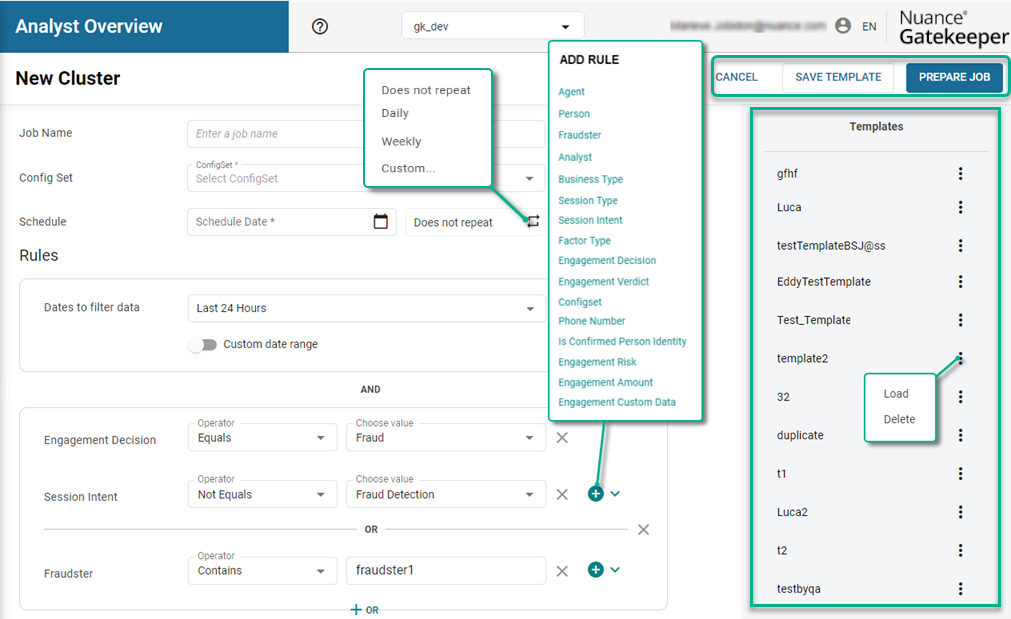
To create a cluster job from scratch or with a template:
- In the top-right corner of the Analyst Overview dashboard, click Create Job > Cluster.
- Create a job from empty fields, or select a template. Under Templates, select the three-dot menu beside the template you want to use, and click Load.
- Name the cluster job.
- Select the configuration set for the job. This is used to implicitly select the calibration model for the media collection, which controls which piece of audio file from an engagement is included in the cluster. If the clustering calibration model does not match the voiceprint calibration modeled, the media collection is empty.
- Click the Schedule field to schedule the cluster job to Run now or select Custom to schedule the job to run later. You can also click the field to the right to the schedule the cluster job to repeat at specified intervals.
- Select or define a custom time period from which to filter the data.
- Optionally, add rules and define each rule’s Operator and value. Use rules to narrow down your investigation by using rules to define the types of engagement included in or excluded from the cluster job.
- Click Prepare Job. The system estimates the size of the media to be analyzed.
- Click Prepare Anyway to schedule the cluster job.
Use templates
Use clustering templates to speed the creation of new jobs.
To create a template:
- Fill in the details for a cluster job from scratch or from modifying a template.
- Click Save Template.
- Name the template, then click Save.
To display or delete saved templates, click the three-dot menu beside a template in the Templates panel. Available actions are as follows:
- Load Template: displays template parameters which you can modify or rename.
- Delete: removes the template (and related parameters) from the list.
View completed cluster jobs
The Analyst Overview shows a list of completed cluster jobs under Clusters. Each cluster job contains the clusters found by that job, along with their details and rankings.
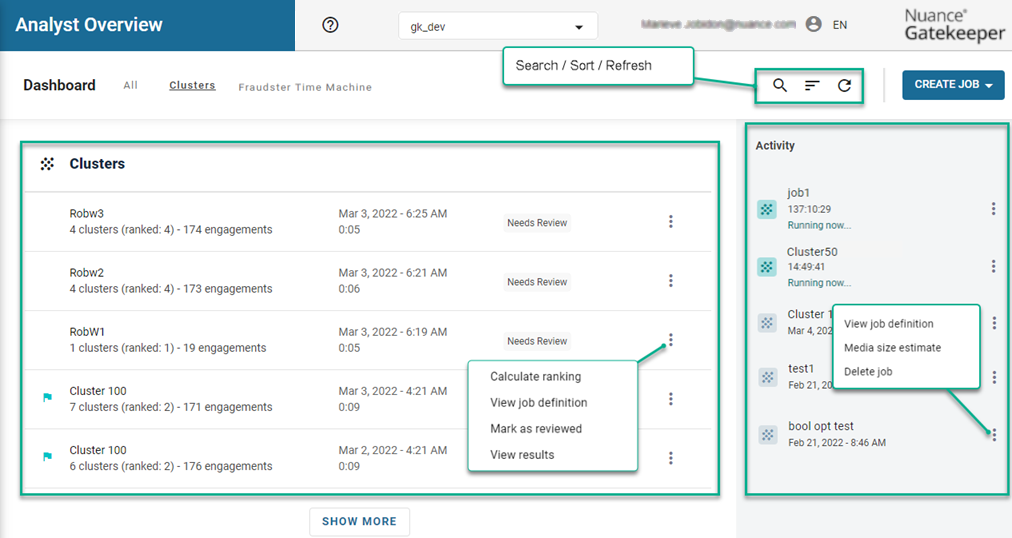
To take action, click the three-dot menu beside any cluster job.
This cluster job-specific menu also lets you:
- Calculate ranking (if ranking parameters were modified)
- View the job definition (to see the configuration)
- Mark the job as reviewed
- View the job results (you can also click the cluster job itself)
For running or completed cluster jobs, you can:
- View the job definition
- Estimate the media size
- Delete the cluster job
Adjust factor ranking weights
The system ranks the suspiciousness of clusters using a score from seven factors at the time of the cluster job execution. Each factor has a modifiable ranking weight, so you can adjust which factors have more or less of an effect on ranking scores.
See Cluster Rankings for an explanation of each factor and the ranking weights.
To adjust the factor ranking weights:
- Go to Configuration > Clustering.
- In the RankingWeights row, click Edit. The RankingWeights editor appears.
- Adjust the ranking weights as desired.
- Click OK. The RankingWeights editor closes.
- Click Save Changes.
Review clusters
Analysts use the tools in the Analyst Overview dashboard to review suspicious voice engagements within clusters marked ranked as interesting. This dashboard provides the following details about each cluster job:
- Name of the cluster job / Number of clusters / Total number of engagements.
- Date and time of the job execution (list sorted in chronological order).
- Indicates if the cluster was flagged by an agent and needs review.
Cluster jobs use the engagement values (like verdict, decision, and so on) and ranking weights at the time of the cluster job execution. If an engagement’s values change, the cluster ranking might be out of date.
To update a cluster’s ranking:
- Click the three-dot menu for the cluster you want to update and click Calculate ranking.
- Select the configset to use for the recalculation.
- Click OK.
When reviewing clusters, keep in mind that the system assumes the audio files of a cluster belong to the same speaker.
In the list of cluster jobs on the Analyst Overview, analysts can see which jobs have been reviewed. A blue flag ( )to the left of a cluster job indicates that an engagement within the cluster was flagged with an alert. For more details about the Analyst Overview, see View completed cluster jobs.
To view the clusters found by a cluster job, click the job. This opens the Cluster Results page.
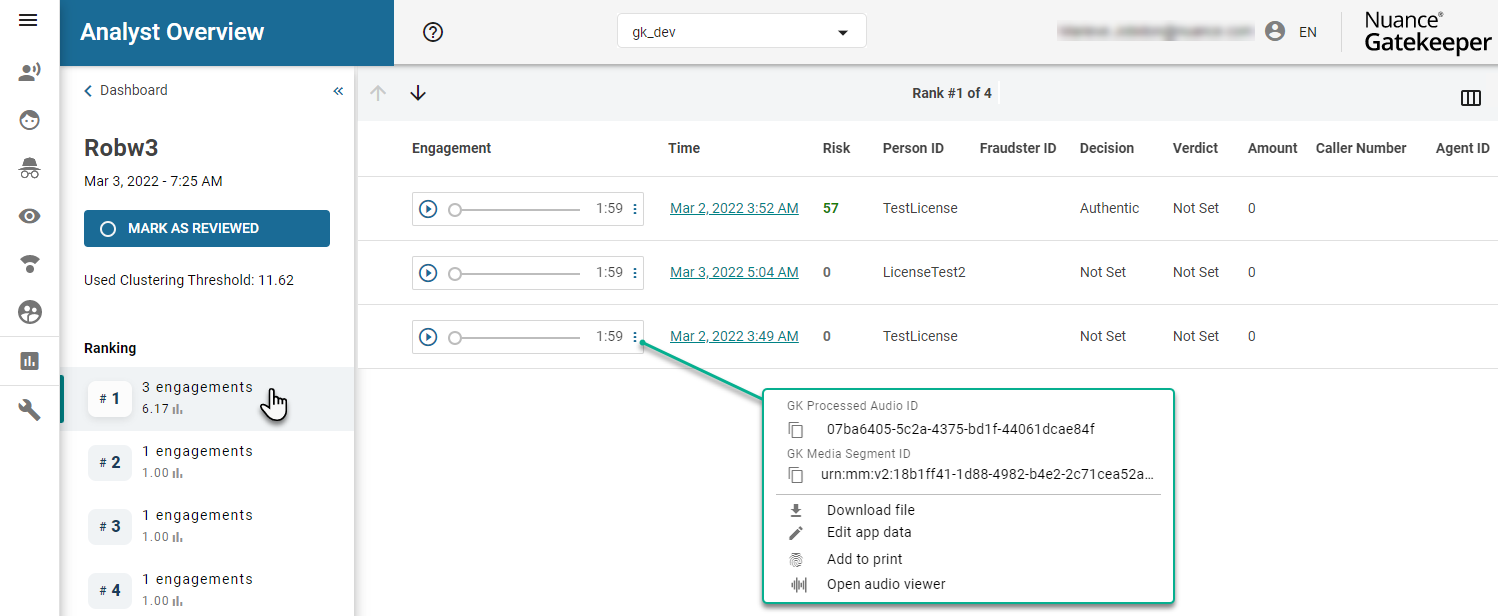
The Cluster Results page lists the job’s clusters on the lefthand side, under Ranking. The clusters are ordered by ranking score, so the most interesting clusters (according to the set ranking weights) appear at the top. For more details on rankings, see Adjust factor ranking weights.
Click a cluster to see the cluster candidates in the righthand panel. This is where an analyst can compare the audio segments contained in a cluster to uncover suspicious behaviors. You can listen to each engagement and view details such as risk score, person and fraudster ID, the fraud verdict decided by a fraud analyst, and more.
Depending on the scope of the inquiries, columns can be shown (checked) or hidden (unchecked) using the column icon above of the table.
When reviewing engagements on the cluster results page, you can:
- Click the play icon from the biometric sample, under the Engagement column, to listen and compare the audio files within that cluster. The system selects the audio segment based on the configuration set for the cluster job and by finding the longest audio segment in the engagement.
- Click the date under the Time column to access the engagement’s page for more details.
- Mouse over and click the left side of the biometric sample to flag suspicious audio files. This generates a fraudster alert in the cluster and creates an additional session for the selected engagement. A flag also appears to the left of a cluster job on the Analyst Overview.
By flagging an alert, you update the display throughout the engagement, the group ranking, and the cluster job (on the Dashboard view). In addition:
- The engagement verdict becomes “Not Set” (to reopen the investigation).
- The engagement displays a new clustering session with a new risk score.
- The new risk score affects the overall risk score for the global engagement.
When you’re done reviewing a cluster job, you can click Mark as Reviewed on the lefthand side.